LEARN MUSIC AND AUDIO PRODUCTION | Wavmonopoly TIPS AND TRICKS
How to use a compressor: A beginners guide to understanding Audio Compression

wavmonopoly May 24, 2022
Audio compression is a powerful tool in music production that can be used to shape the dynamics or dynamic range of your mix. Audio compression is essentially an automatic volume control that makes soft signals louder and loud signals softer. Audio compressors are often described with five key parameters: ratio, threshold, attack, release, and gain. In this article, we will go over how each parameter works so you can decide which how and which compressor best suits your needs!
We all have been there before and understand that audio compression can be a daunting mixing technique but after you get thru this guide you’ll have a complete understanding of compression.
Jump to these:
- Dissecting a Compressor
- What does an audio compressor do?
- How to use the compressor ratio?
- Threshold is the master of your audio compressor
- Dialing in the attack time
- Let’s talk about release time
- Remember to add makeup gain
- Pro Tips on how to better use your compressor
- Stack your compressor
- Parallel compression on vocals bring the presence
- Meters are your friend, Watch them
Dissecting a Compressor
Note: If you are a visual learner, below you will find a comprehensive video guide to using compression.
What does an audio compressor do?
When working in audio, you will find yourself hearing over and over again about compression. Well, let’s start with that very question. A compressor is used to reduce the dynamic range which is the difference between the loud and quiet parts. The compressor is used to bring the loudest parts of an audio signal and bring them closer to the quiet parts. Now, something to note is that by lowering the louder parts, naturally, you will be losing some levels in the output signal which is called gain reduction. Now I don’t want too deep yet but now that you have an understanding of how a compressor works. Let’s get into the nitty-gritty of how we use each parameter to perfectly dial in our compressor.
How to use compressor ratio
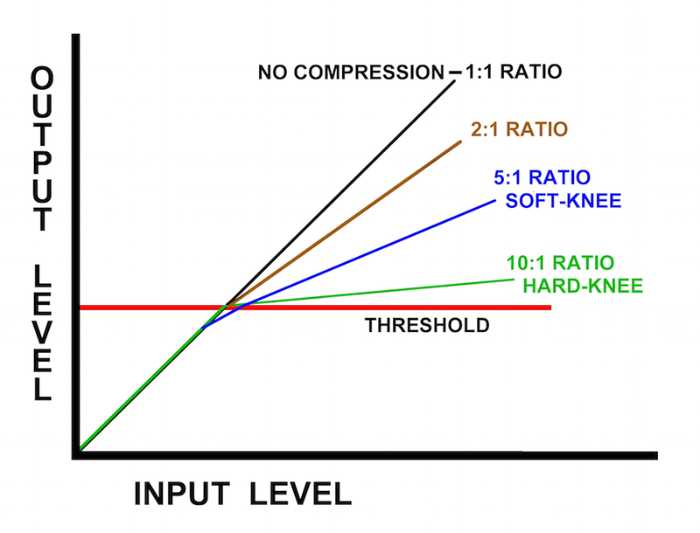
So now that we know that a compressor lowers the level of the loudest part of an audio signal, this brings us to the compression ratio. The compression ratio determines how much those volume levels are reduced.
For Instance, we set our ratio to 2:1. This means that for every two dB the input gain exceeds our threshold, only one of those original two will be allowed to pass through.
So if a vocal goes 8 dB over the threshold, it would only allow 4 dB to be heard through it.
The same goes for if we use a 10:1 ratio which is getting closer to limiting, but when the volume reaches 10 dB over the given threshold, the compressor will allow only 1 dB to come thru it.
So just to reiterate, the ratio is the amount of gain reduction that occurs when the compressor is activated.
But that leads us to our next topic in which we mentioned a few times above, the threshold.
Threshold is the master of your audio compressor
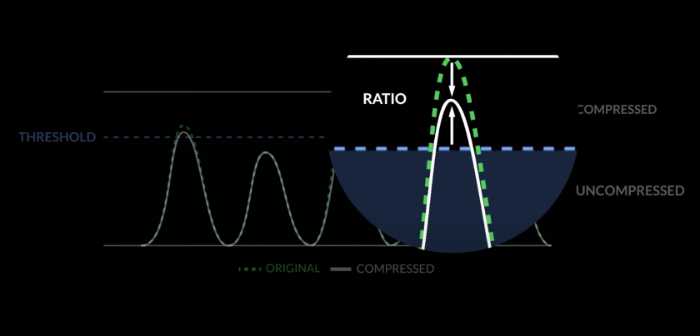
The threshold is the most important parameter of a compressor. It is the point at which gain reduction begins to take place. It is very important to not only read the meters but to also use your ears when setting your threshold to make sure not to use excessive compression. So, if you set your threshold level too low, then your compressor will start to reduce the volume of any signal that goes over it.
On the other hand, if you set your threshold too high, then you will not be getting any gain reduction at all. The compressor won’t kick in if the input signal doesn’t cross the threshold.
For instance, you set your threshold at -20 dB, the compressor won’t affect any audio signal below this level but as soon as that same signal crosses -20 dB the compressor will begin gain reduction.
Below is a graph showing the relationship between threshold and ratio.
Quick Note:
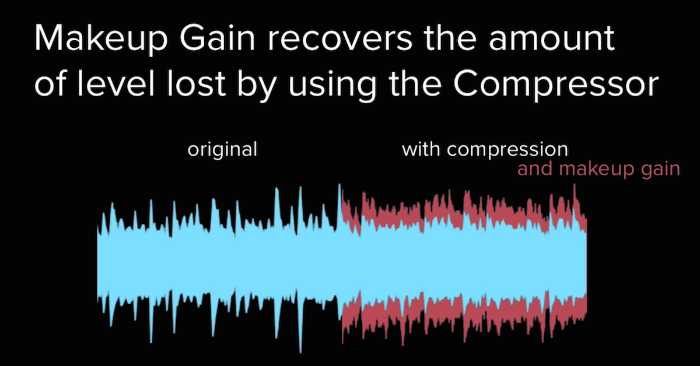
Make sure to use your makeup gain to compensate for the loss of your output level because whenever we are lowering the loudest parts of the compressed signal, we are also losing our overall volume level.
So it is important to find that sweet spot where the threshold meets your desired audio level.
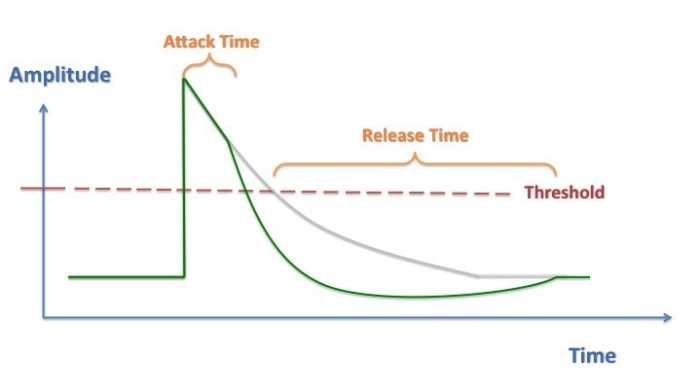
Dialing in the Attack Time
Since we are more familiar with our threshold and ratio, let’s move on to the attack and release time. First the attack, the attack time is the time it takes the audio compressor to begin to compress the audio signal. Meaning how fast or slow we want it to compress that signal.
Now this is where you can begin to shape the sound of the input signal. Whether you was a very fast attack to cut off the first instance of transients for a smoother compression or set it to a slow attack to allow more transient energy to cut thru all is determined by you.
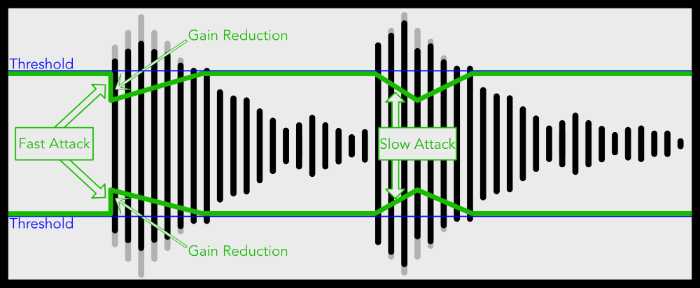
But to be a little more technical, if the attack is set to 9ms, and it goes above our given threshold of -20 dB, the compressor will take 9ms to fully activate.
Now setting the attack time all depends on the voice or instrument you are working on. But generally speaking, you would want a fast attack on rap vocals.
Lets talk about Release time
Release time is exactly how it sounds, the release controls the time it takes for the audio compressor to let off of it. Literally the opposite of attack parameter.
This can drastically affect the way a vocal sounds when being compressed. I would suggest turning the release to the fastest setting and listen to it, and the do the same to the slowest setting and listen. Once you get the feel of what each setting is doing, go and dial it in into your liking.
Remember to add Make Up Gain
One thing you are guaranteed to notice when compressing vocal or any audio files is that it will get quieter.
In order to properly level we use “make up gain” or “output gain” to bring back up the levels coming out of the compressor.
Pro Tips on How to Better Use a Compressor
To help you skip a few years ahead of your journey to becoming the best audio engineer you can become, we have added some pro tips on how to better use an audio compressor.
Quick Tip # 1 – Stack your compressors
I know to a first-timer hearing this, it can sound very intimidating but trust me this will all make sense very soon. But let’s start here, why would we want to use multiple compressors instead of one.
We use more than one compressor to evenly divide the work of the compressor.
Using one audio compressor to do all the heavy lifting can sometimes lead to unnatural sounding compression. But allowing more than one to share the load will sound more natural and give you more even compression.
For instance, if you have a rap vocal that has a lot of dynamic range, then using 2 or even 3 compressors can make controlling the vocal a lot more natural and not obvious.
In this case, using a fet compressor like the famous 1176 compressor in combination with an optical compressor like a LA-2A compressor can give the vocal a nice even dynamic range compression. We would place the 1176 first to catch the transients and then use the LA-2A to compress the vocal as you normally would.
Quick Tip # 2 – Parallel compression on vocals brings the presence
Parallel compression is lightly processing the vocal and then applying more heavy compression on another track or send to then lightly blend the overcompressed track with it. Using this method can make your vocal pop out in the mix and allow it to cut thru.
For instance, you could want your 40% lightly compressed vocal to blend with 60% of the over compression blend. This will allow for better dynamic control over the vocal.
To do this technique, send all the desired vocal tracks to the over compressed bus/aux track, we want this compression to be working at about a -10 reduction.
Now carefully raise the compression up the point when you start to hear it affecting the vocal and start to sit within the mix perfectly.
Quick Tip # 3 – Meters are your friend, Watch them
Most audio compressors these days have a visual representation of meters built in to show you how much audio is being compressed.
Make sure that the compressor is engaging and disengaging, or make sure that the meters are moving at time and not moving at other times. This will make sure that your audio compressor is doing its job, if you notice no metering occurring then your threshold more than likely is set to low and the audio file isn’t being compressed or affected at all.
Conclusion
I hope you enjoyed this article on compressors and how to use it. If you take anything away from this article I want you to remember to always use the compressor properly and to not over do it. Overcompression can make a mix very unnatural and ruin a mix. If you want more on compressors I suggest reading compressor tuning articles or go watch some youtube video linked above in the article. Hopefully you learned something new and can apply it in your next mix. Thank you for reading!